

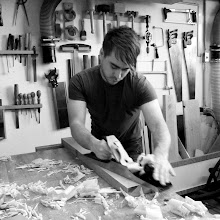
There are plenty of times when for one reason or another you have to get things right the first time. You might have a fast approaching deadline, perhaps you only have enough material for one try, or the material is expensive enough that you really can’t afford to waste it. In the case of my latest projects, all three happen to be the case.
I am preparing a new body of work to show (Model Citizens NYC 2010) during NYC design week and ICFF. With just a month left to get prepare and I have a very (over) ambitious plan to launch a furniture collection, a series of chandeliers, and have two small production runs for sale. There’s a lot to do and there’s no time to waste. There is also very little time to test/experiment/prototype/fail so every design decision has to be sound as a pound.
Depending on who you ask, K.I.S.S. either stands for “keep it simple and stupid” or “keep it simple, stupid”. I prefer the second more derogatory interpretation and in the spirit of “design for dummies”, I’ll be assuming an appropriate tone as I introduce my three step program to avoid going down in flames while working under tight deadlines:
1. Don’t Reinvent the Wheel
So think you’re a modern day Franklin or Edison?
News flash: You aren’t.
 It takes a lot of time to design a chair from scratch and get it just right. It takes time you don’t have. So what should you do?
 Find a comfortable chair and copy it.
No, don’t mean make the same chair, dodo.
I mean, find a chair you like that is designed for a specific task and pull off some measurements. Use those measurements as a baseline of comparison and a jumping off point (Record the seat height, length, angle etc, etc....) Also, having a chair around will help you visualize the chair in space and allow you to try out little mod-cons.
Here, I took some rubber bands and stretched them between the legs to layout the stretchers. In my original sketch, I had the stretchers oriented perpendicular, but seeing it in space and full size didn’t look right. First bullet dodged, Einstein.
2. Baby Steps
 My design process is a series of steps that moves progressively from abstract to real. By its nature it goes from quick and loose to very precise. I make sure that all the “big” decisions are resolved as early on as possible and changes can still be made without starting all over again. I give myself flexibility, knowing that mistakes are inevitable and it’s definitely better to take your licks earlier rather than later. I start every design with a sketch. I draw orthographically with a pencil and paper and can quickly get a sense of the shape of a thing. Drawing is essential. Drawing is a learned skill and activates a special part of the brain. Your hand and eye become linked, and as the sketch takes shape you have made the first step making your idea a thing. I don’t think that I could ever “sketch” with a computer. It’s not as direct and uses a different part of your brain. A part that is too rational, too mathematical.
It’s next I will take my sketch, and produce make a “drawing”. Like a blueprint, the drawing includes measurements and will be used to refine joinery and create cut lists. The drawing is not full-sized, but it is large enough not to leave out any detail. This is where you CAD-monkeys start becoming worth their salt. Making a drawing in Solidworks, MasterCAM, or even SketchUp can make your drawing more accurate and allow changes to happen more spontaneously. I generally don’t use a computer for my drawings, but going through this process a lot recently, I have been think more and more about dusting off the Solidworks getting it fired up with Boot Camp on my Mac.
 The drawing is then used to produce a Frankenstein-foam model. The Foam model is small and it is a tool to visualize your drawing in three-dimensional space. Don’t waste time making it pretty; just make sure it is mostly accurate to scale. This is the time to try out some BIG changes— don't be afraid to hack up your model. Working with foam-core and hot glue is cheap and fast. From here on out every change is going to start hurting a more and more, so get it out of your system. Keep an eye out for red flags. Use what you learned from the foam-model and refine your drawing accordingly.
At this stage in my chair , I confirmed that I would have problems with the splay of my legs. The joinery of my chair was ported directly from a bench and a stool, both having geometries that were relatively simple and seats are level. The issues of of an angled seat and back became instantly apparent in the foam-core. I tried several different angled rear legs and established a baseline stretcher spacing to be refined in the next step.
3. Build by Numbers: Size Matters
“If you want to kiss the sky, better learn how to kneel” …on your knees dummy!
That’s a lyric from a U2 song. What Bono is clearly trying to say about design is, you should start small before you get bigger.
 Taking Bono’s advise, I make very accurate scale model where every ¼” inch equals one inch. This allows me to finalize my design and process planning, by essentially building the entire thing once, just teeny tiny. Now, this is still a model, so it need not be refined, but now you are shooting for accuracy. This model will ultimately be used to refine your drawing and a real reference for measurements in the final product. This is where you are taking a hard look at the design— refining proportions, trying out some different shapes. This the last time you will be able to say, modify a seat, seat back, leg splay or leg spacing in a couple in minutes instead of hours or days. Also, This is where I re-draw my drawing to the 1:1 scale with my model. This makes direct measurement much easier and accurate.
 I scaled the model based on what size scrap boards I had around the shop. I had some ¾” poplar that I milled down to 3/8 and ½ thicknesses- these will be equivalent to the 1-1/2” and 2” stock I will using for the final chair. I milled up enough wood that I could make enough parts for dozens of little chair legs and stretchers knowing that I would have to play around a lot with those parts. I only milled enough wood for 3 seats, any ended up using them all. Also I discovered that I would most likely be making the seat back out of a 3” thick piece of walnut (not cheap), I’ll redo the model and fully shape that part before, messing around with a 40 dollar hunk of wood.
  Also, I should say that all the little parts are connected with 1/8 brass rod. The brass rod is equivalent to the 3/4” dowels that will be used in the full-scale chair. The brass is quick, strong and if you slightly flatten the ends with couple of hammer taps, the fit in the wood is snug enough not to use any glue.
 Below is a picture of some of the alternative parts that I made. I keep track of the parts that make so I can compare revisions and mix and match sizes. So there you have it. 3-easy steps to get you on your way, knuckle-head!
 Prototyping is hard, but tackling a problem in an orderly manner can take (some of) the stress out of the process. It also can keep the pie out of your face when it comes time to deliver the goods and have your work scrutinized. If you are in a hurry it pays to spend the time bulletproofing your plan before you start tooling in to the wee hours (losing your mind).
As for this clown, I know have a lot of work cut out for me, but feel a lot better with my doll (action-figure) sized chair to guide me though the process. Of course, knowing is only half the battle!
2 comments:
There are a number of
prototyping manufacturer companies that you can contact so that you can have your design out in the market soon. I would like to commend you, because your design is very innovative. I do appreciate you posting all the details of how you come up with the chair. I believe that your work of art is very promising.
You’re right. It’s very hard if you can do accurate things at the first step. I like your courage and you have done it well.
Post a Comment