

The File-nal Frontier (oh dear, that’s bad)
In this the final chapter of our sawing quadrilogy, we will be address this saw’s mettle. First, I’ll prep the saw plate removing any rust and giving it a light polishing. Next, we’ll talk sharpening, and I’ll give this old dog some new teeth.
In this the final chapter of our sawing quadrilogy, we will be address this saw’s mettle. First, I’ll prep the saw plate removing any rust and giving it a light polishing. Next, we’ll talk sharpening, and I’ll give this old dog some new teeth.

Going back to the very beginning, here is a picture of the sorry state of the saw plate. There is a lot of surface rust and a bunch of sections that are probably pitted. The good news is that the plate itself was very straight and the teeth were all intact and shaped very well. Heading over to my sink, the first order of business was to give the blade a scrape to remove any raised bits and give the plate a bit of a scrubbing and clean off any oils. Next I gave the plate a 15+ hour bath in Evapo-rust.
The Evaporust makes quick and easy work of any remaining rust, but it also leaves the metal coated with a grayish layer of oxidation. This layer will protect the blade from rusting, but it looks pretty nasty and because a shiny plate is helpful for making square cuts, so the gray has got to go. This is accomplished easily enough with a fine steel wire brush mounted in the flex-shaft accompanied with some Gojo pumice hand soap. Alternatively, I have used GlassPlus or WD40 both which both work well. I use GlassPlus or alcohol to clean metal parts before coating them with a rust inhibitor (camilia and/or boeshield). Using water at this point can cause flash-rusting, which is a real pain considering that you just finished shining up surface nice and bright.
The Evaporust makes quick and easy work of any remaining rust, but it also leaves the metal coated with a grayish layer of oxidation. This layer will protect the blade from rusting, but it looks pretty nasty and because a shiny plate is helpful for making square cuts, so the gray has got to go. This is accomplished easily enough with a fine steel wire brush mounted in the flex-shaft accompanied with some Gojo pumice hand soap. Alternatively, I have used GlassPlus or WD40 both which both work well. I use GlassPlus or alcohol to clean metal parts before coating them with a rust inhibitor (camilia and/or boeshield). Using water at this point can cause flash-rusting, which is a real pain considering that you just finished shining up surface nice and bright.


The plate's looking pretty good now. I was a bit disappointed in the amount of pitting in the blade, but ultimately I don’t think it will have too much of an effect on the performance of the saw(?), but it will certainly give the saw some additional character.
On to the teeth…
Sharpening the teeth is yet another “first” during this project, and something that I have been eager to try my hand at for a longtime. I have been giving all of my saws a lot of use in the past months and inevitably I will have to touch them up. This project is a good excuse for me to jump in and practice on a saw I don’t have any hang ups about(yet). Nevertheless, I don’t want THIS to be the FIRST saw I sharpen, so I rustle through a bin of “utility” saws and dig out a Crown dovetail Saw that I someone had abandoned at the end of the year at RISD when I was a grad student (BTW it’s amazing what people just throw away). I have been using this little saw to cut little pieces of aluminum.

I started out by tapping out most of the set with some strips of wood and hammer. Next, I took a felt tipped magic marker and marked the teeth. I mounted the saw in a saw vise for the filing. I haven’t decide how to mount the vise yet (for filing standing up or sitting down), so I simply clamped it to a piece of plywood which is clamped firmly into my face vice and sliding deadman. The little saw took barely anytime to sharpening. I first jointed the teeth with a mill-file held in a little jig. This ensures all teeth are at the same level. I decided I would file this saw rip with a small amount of fleam so I zipped down one side taking two swipes of a little needle-file held at zero rake angle and a slight angle (5 degreish off perpendicular to the plate's plane) on every other tooth. Then I flipped the saw around in the vise and passed over the remaining teeth.


This is where the marker is worth its weight in diamonds. It’s amazing how easily you can lose your place if you focus drifts for a second. Staring at tiny little teeth is dizzying enough as it is. I am thinking about getting a magnification headset to help focus, and help me look a whole lot cooler.


After I sharpening I made some test cuts and the little saw was zipped right through a little piece poplar. The difference from before and after was staggering! While I really don’t like straight handled push saws, the quality/feel of cut was starting to approach the qualities to my much nicer backsaws.

Game time for our boy, Billy-Phil Jr.
To begin with the saw plate was filed 10 ppi rip with a somewhat relaxed rake. I decided that I would turn this saw into a crosscut saw, so the first step was to reshape the teeth slightly by shifting the rake back to ~15 degrees (this is the angle of the face of the tool -15 from perpendicular from the tooth line). To help guide the shaping I made a little block of wood with a -15 degree angle running in front of a little hole slightly undersized from the width of the triangular file. I align on of the faces of the file with the line and gave it a couple taps of a hammer reaming triangular grooves in the block. I also made sure to draw in references for the orientation of the block. This is important because you will flip the block and use it from the other side when you flip the saw filing alternate teeth.


Again, the first step was to magic marker the teeth and joint the toothline with a file. Next, I filed the entire toothline to a 15 degree rake and removing the flats made by the jointing. Next step was to set the teeth. This is the process of pushing every other tooth to one side or another. This is accomplished with a little device called a "saw set" which grabs the blade while a little piston equally nudges each tooth a very small amount.

The set of the teeth keeps the plate from bindingand allowing for a little bit of steering in the curf. I will be using this saw for dry hardwoods and so I set the saw a very small amount. After setting I took one little pass to joint the saw again evening out any inconsistencies caused during setting.
For the final sharpening for as a cross cut saw, I had to add the "fleam", the alternating angled profile of the of the teeth that turns each tooth into a little knife, as opposed to a little chisel (rip). From my research, I chose a 20 fleam angle, which seems to be a general all-around setting. The next time I resharpen, I might also try adding “sloped gullets” which add a third angle by tilting the end of the file down, but for now I’ll keep it as simple as possible.

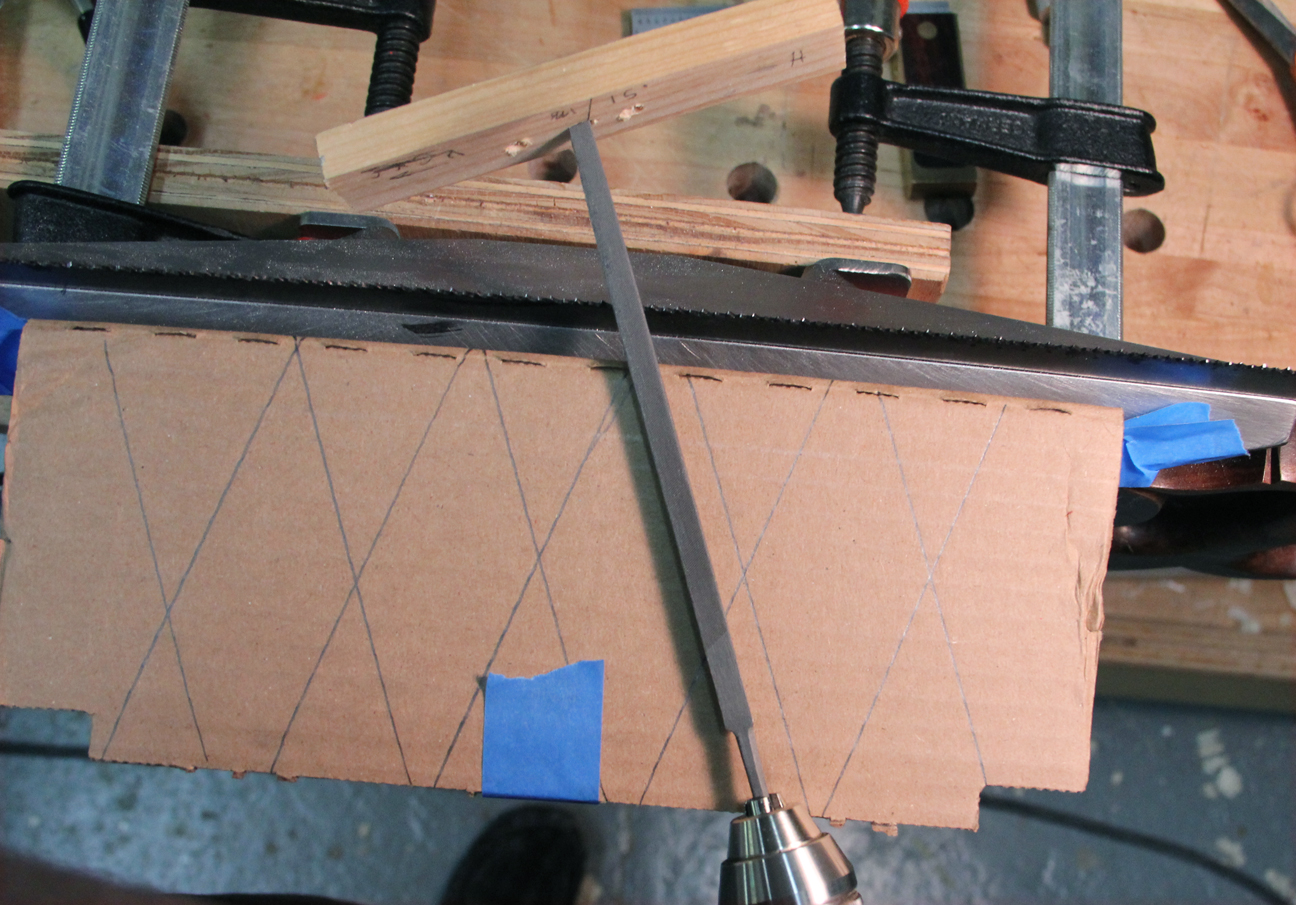
To help establish this fleam angle, I bent a strip of cardboard and taped it to the front jaw of the saw vice. I am thinking that I will make a little angled shelf for the vise that attaches with magnets that I can draw angles on. It would be a great accessory (I should email the maker about that). Also, I made a little mark on the back of the file where to start the file when the guide block touches at the correct angle(not pictured). These visual guides made keeping a relatively consistent angle pretty STRAIGHTforward (harhar). All and all the whole process sharpening, making little guide blocks, and taking photos maybe took half an hour for a saw with a 24 inch blade. Not bad.
The results?
I’m pretty happy. I don’t have too much experience with handsaws, but it certainly beat the pants off any of my backsaws speed-wise. The saw was cut straight and true, and the cut surface wasn’t THAT horrible (nothing a little bit of shooting couldn’t clean up).

Final thought:
I am hooked. I love the saws, I love the saw making, and I will be doing a lot more. I am already 2/3 of my way through my next saw (a 7 point Disston no.7) where I reshaped the original donkie beech handle. The second handle not only went much much quicker, but my lines are crisper and I also have nailed a winning finishing regiment with tung oil and French polish (where was this technique my entire life!). I am not entirely happy with my finishing job on my first saw handle. I will probably redo whenever I really have nothing better to do, but that wont be anytime soon. I have two or three more old saws in the pipeline right now before the real fun begins- making some brand new saws from scratch. I think this could be the start of a beautiful friendship, obsession.


No comments:
Post a Comment